 Planting a tree is easy-breezy, right? Just dig a hole, stick the baby tree in it, cover it back up and – voila! Mission accomplished.
Well, sort of. That version of “mission accomplished” can result in a tree that suffers from dehydration, malnourishment or root/trunk rot if you don’t do things quite right. If you’re interested in planting trees that not only survive, but flourish into strong, tall, long-lived and healthy natural legacies, you’ll need to put a little more into it.
When I was a young boy, my father planted hundreds of trees. I helped him with almost every single one, keeping my fingers crossed that they would because I was the one that had to water them and mow/trim around each one die (apparently my arborist aspirations hadn’t kicked into gear just yet…). But, as each one of those trees can attest, my father did things right – and the trees (as well as my career) have flourished ever since.
If you consider that most tree species live anywhere from a few decades to a few thousand years, it makes sense to plant them right.
11 Steps to Planting A Tree
Planting a tree properly requires the right tools, a little planning, attention to detail and love (that’s right – LOVE!). Here’s how to go about it in 11 simple steps:
Procure the right tools.
To plant your tree, you’ll want a tarp or decent portion of plastic sheeting, a good-quality shovel, a digging bar (only necessary if the area has compacted or hard soil), metal snips or bold cutters, a tape measure, a hand cultivator (that funky, three-pronged tool that never made much sense before now), fertilizer and a utility knife.
Make a plan.
Make sure the spot you’ve selected makes sense for the tree you’ve purchased. Will it be able to grow as tall and broad as it can without causing interference with utility lines, your roof, the neighbor’s roof or other trees and plants in the vicinity?
Mark the spot.
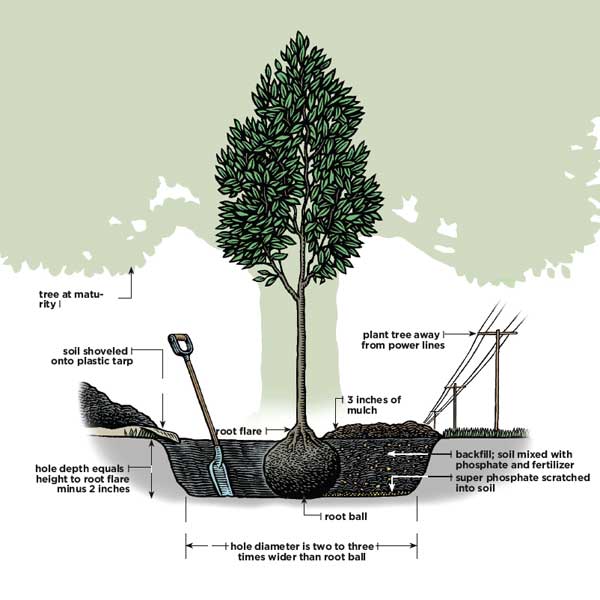
In this case, a circle marks the spot. Make a circle around the tree that is about two or three times the diameter of the root ball. You can draw the circle with marking paint or simply hack it out of the turf or ground cover with the shovel tip.
Free the roots.
Stand the tree upright and remove the burlap from the top of the ball. Now’s your chance to wield that hand cultivator with glee. Use it to loosen the soil at the top of the root ball so it starts to expose the root flare. Refer to the graphic above to make sure you’ve got the right spot. Use the tape measure and measure the height of the root ball from the base of the root flare to the bottom of the ball. Subtract two-inches from this number and that’s how deep you get to dig the hole.
Start Digging.
Now, for the fun part. If I were you, I’d enlist the help your younger kids and neighbors who still think digging is fun. Lay the tarp down beside the marked circle. Remove the top layer of sod or ground cover. This should be removed or transplanted elsewhere on the property. Start digging, adding each shovelful of dirt on top of the tarp. If the soil is hard, loosen the soil at the bottom of the hole so transplanted roots have an easier time working their way into the earth.
Add Superphosphate.
Dust the bottom of the hole with a layer of Superphosphate, which adds important nutrients – primarily phosphate, calcium and sulfur – into the soil. It’s like sending your kid out to play with a snack bar to tie her over until lunch.
Place & Plant the Tree.
If you’ve been working solo up to this point, it’s nice to have a helper for this next step. Roll the root ball into the hole and have your helper rotate it around and around so you can put its best face forward. Once you’ve found the perfect angle, remove the rest of the burlap and use the cultivator again to loosen the rest of the roots.
Fertilize the Soil.
While one of you frees up those hundreds of tiny roots, the other one can mix some more superphosphate and a 3-4-3 fertilizer into the soil pile resting on the tarp. The quantity of fertilizer required will vary depending on the specifications proved with your tree. Mix it up well.
Replace the Soil.
You’re almost there! Now it’s time to replace the soil by shoveling it into the hole, but without burying the root flare, which needs to remain exposed. Once the hole is filled to the proper height, use the remaining soil to create a curb around the edge of the hole, measuring about 6-inches high.
Water Generously.
Grab your hose and fill the crater all the way up. As the water makes its way through the soil, it will pack the soil down just right – filling in any air pockets that were formed along the way. Once the water has percolated through the soil, use your shovel to knock the curbing into the hole and smooth it all out.
Add Mulch.
Finally, add 3-inches of your favorite mulch on top of the fresh soil. This will help to insulate the roots, slow down the growth of weeds and conserve water. Mulch also adds additional nutrients to the soil as it breaks down. Remember to keep the mulch away from the bark and the root flare.
After You Plant Your Tree
 For the first six weeks, your new tree needs to be watered every single day. Watering can be done manually or using a designated line on your drip system. Of course, you get a free pass on rainy days. After six-weeks, your tree will be ready to stand on its own hundreds of roots, only requiring water as the nursery instructions state. Enjoy the next several decades of fresh oxygen and cool, refreshing shade.
If you’d like to find out more about caring for your trees contact us for a free consultation or give us a call at 610-365-2200, and we'll answer any of your questions.


